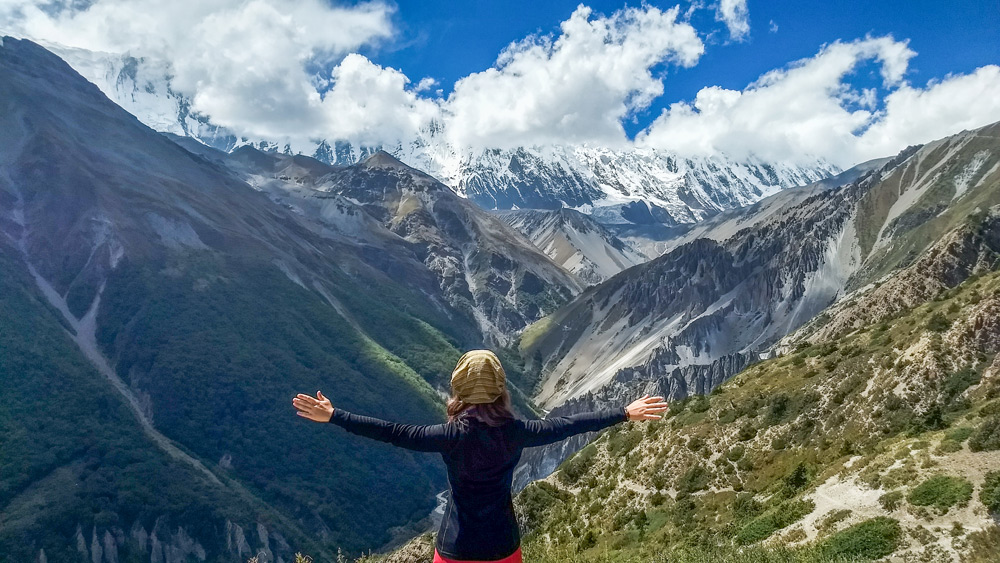
Nepal is a special destination for me. It is the first country where I’ve seen the mountain peaks for real a few years back and that view stays in my head till date. My first trip was stuffed with different cultural activities, sightseeing, and natural places, however, I didn’t go for trekking in Nepal. I had my own fears and questions which required something beyond Google.
This post will be all about Annapurna Circuit trek. My friend has done this trek a few years back and shared with me different suggestions about the clothes, itinerary, permits, and topics I had no idea about. Basically, she was that factor that made me believe that I can do it by myself too. Now, when I have upgraded my knowledge with the experience, I want to share it with you.
Maybe this post will become that motivating push for someone to take this challenge. I was writing this guide as a person who has completed the first serious trek and kept in mind my questions and fears I had before. My main goal is to provide a big picture and a starting point for further planning. I’m also working on an Annapurna Circuit guidebook (pdf version) that you will be able to download and take with you.
Summary: YES, you can trek Annapurna Circuit without preparation. NO, you don’t need a guide or a porter. YES, you can complete the whole trek with close to none mountain sickness if you do correct acclimatization. Here is a table of contents for your convenience:
- Best time to trek Annapurna Circuit
- Annapurna Circuit solo – is it safe?
- Setting the right expectations for the trek
- Distance & time: how many days do I need to trek Annapurna Circuit?
- Trekking yourself vs hiring a guide and/or porter vs agency
- Do I need to be fit for Annapurna Circuit?
- Trekking permits in Nepal
- Accommodation during the trek
- Food on the trek – Dal Bhat Power – 24 hour
- Packing list: what to take with you to trek in Nepal?
- Annapurna Circuit itinerary
- AMS, HACE and how to avoid mountain sickness during Annapurna Circuit
- Annapurna Circuit cost
- How to save money on the trek?
- Last notes about the Annapurna Circuit
Best time to trek Annapurna Circuit

The best time to do Annapurna Circuit is October, November, March, April. There will be people trekking throughout the year. I’ve done Annapurna Circuit in September (low season) and I was very happy about this decision.
Firstly, there are few tourists in September, so it feels like one on one with nature. Sometimes you don’t see anyone for hours. Secondly, you can get great discounts and deals on accommodation and food which are, as a rule, not possible during the high season. Thirdly, it’s not that cold at the higher altitudes (you will still need multilayers feather coat, sleeping bag, etc).
Annapurna Circuit by yourself – is it safe?
Nepal is one of the most tourist-friendly countries and Annapurna Circuit is one of the most well-developed and popular treks. If it is your first trekking experience, you might have started with information about the area from Google. Several safety indicators:
Living conditions in Annapurna trail – it’s not a trek, where you need core equipment like tent, utensils, gas, etc. You will be staying in proper guest houses and hotels with all basic needs: from bed to Wifi even on high altitudes.
Route paths – on every confusing junction, there will be a sign or indicator where to go. A few samples further. Mostly, all the paths lead to the place you need. I took a wrong path twice because of my lack of attention, though I ended up in very scenic places at the end.

People – every 2-3 km there will be a village with local people and guest houses ready to answer your questions. Depending on the month, you will be meeting other fellow travelers every now and then. Quite a lot during the high season, and some 20-50 people per day during low season months.
Medicine – in bigger villages there will be medical points, where you can consult a doctor in case of any need.
Setting the right expectations for Annapurna trek
Despite you will have access to all the basic needs during the trek, it is important to prepare yourself emotionally for this experience. In my opinion, many people underestimate the importance of emotional preparation for this type of trek.
Initially, I didn’t know what to expect and some of my acquaintances were setting me for a physical challenge. Somehow I was treating this trek as an endurance test for the first two days and, in my opinion, it’s wrong. You will be passing some of the most picturesque villages, meeting interesting local people with their own culture and lifestyle, encountering some elements of flora and fauna for the first time in your life. It is a unique experience and you need to savor and enjoy it! A piece of advice:
- It’s true, that the first 2-3 days might be tougher than others if you are new to trekking. It will take time to get used to walking continuously every day on different mountainous terrains and carry your backpack, but it will become part of you after a while and you will enjoy it 🙂
- Yes, you will sweat a lot and you might be not the most photogenic person during the day. You will be walking a lot and you might get blisters on some paths.
- If you travel during monsoon months, you might face leeches trying to get into your shoes. It will be also quite humid on the lower elevations.
- If you have never been at high altitudes, you have all chances to do it right for the first time and avoid mountain sickness if you do the proper acclimatization.
- Try to avoid negativity by all means. You will have your own challenges to resolve so don’t stick to people who often complain and try to put their problems and emotional burden on you.
- There is an equal probability of good and bad experiences. Set yourself realistically, have a positive attitude and be ready to resolve eventual situations that might occur 🙂
- Yes, you can do it!
Distance & time: how long does it take to hike the Annapurna circuit?
The classical Annapurna circuit distance is 240 km that starts in Besisahar and ends in Nayapul. You can trek Annapurna Circuit in 10 days if you cut the walking distances by taking transport or expand the trek by adding a few sidewalks and experiences. I have cut the first 13 km and the last 6 km by taking a bus because the path was going through the vehicle road which was dusty and under construction.
Nevertheless, I’ve added a bunch of places on the higher altitudes, which I will talk about in the itinerary a bit later. Overall, it took me 16 days to complete the full Annapurna circuit (13 days) and add a Tilicho lake(3 days).
Trekking yourself vs hiring a porter and/or guide or going through an agency
In my opinion, you CAN easily do Annapurna Circuit without any guide or porter, unless you have any medical contraindications (if you do, you need to consult a doctor if you can be part of this experience in general).
It was a first serious trek for me. I’ve read numerous guides, forums, articles about this trek and felt that was a good base for me. The key thing is to pack ONLY what you need for the trek. Your backpack should be around 6-10 kg, depending on the season and what you take. First two days will be tougher till you get used to, however, afterward, your backpack will become an integral part of you.
As mentioned previously, the directions are quite clear and there is almost no possibility for you to get lost unless you start exploring offbeat and alternative paths. If you want to explore the local culture of one village or another, connect to the hotel or shop owners, they are very happy to tell you more about their life.
I met a few local people on the trail from Pisang, they took me to a local school, where I could talk to kids and learn more what they study, meet their teachers, etc. Meeting locals will be one of the key experiences of this trek.

Consider that guide for Annapurna Circuit will cost you somewhat 12-15 USD per day; porter – 10-12 USD. In case you go with the agency, you need to add an agency cut as well. After the altitude 3000m, you will meet people offering porter services. Many hotels and guest houses at this point will be offering porters as well. If by chance you feel you can’t do it on a certain point, you will find the solution at the spot.
By the 4th day of the trek I got fit enough to move with local guides and porters of other people. As I do enjoy talking to locals, I have met quite a bunch of interesting people. If you decided you need an Annapurna Circuit guide or porter and you are limited in time, you can start here:
Kaji – he has been trekking different parts of Nepal numerous times and knows a lot about local culture and specialties of each trek. He can guide you and also connect to the porter.
Nalam – a guide with broad trekking experience around Nepal and knowledge of local specifics.
Kam Sarki Gurung – 0986-1477195 – porter – he speaks basic English and knows Hindi. He is a very polite and smiling person who’ve done many treks around Nepal.
Note, I haven’t taken services from these people, however, our paths crossed on a few tea stops on the way. I found them knowledgeable and interesting people to talk to. I’m not anyhow associated with them and I put all these contacts by my own initiative with their agreement.
When you are limited in time, you might end up going to the agency and pay double price. If you choose a guide yourself, ask how many times he has done this trek. You will be meeting guides and porters who’ve done the same trek 20-40 times.
Do I need to be fit for Annapurna Circuit?
You don’t need any special training for Annapurna Circuit, however the more fit you are the earlier you will start enjoying the trek. I was also doubting whether my physical condition will allow completing such a long trek. In daily life, I do prefer walking over taking transport whenever possible and do yoga 15 minutes daily, though it’s not quite a preparation.
Don’t worry, you will have minimum of 5 days of preparation of trekking on the lower altitudes before climbing up. Annapurna Circuit is beginner friendly trek. It is constructed in a way that you can get fit on the way and do it. At the end of the trek, you will definitely feel a healthier and much fitter person than you were when you started.
Unless you have any medical contraindications, I highly recommend to put away your self-doubt and DO IT! You will see plenty of old people slowly moving through the mountainous paths and enjoying the stunning views and landscapes.
Trekking permits in Nepal
You need a special permit to trek in Nepal. There is a TIMS (Trekkers’ Information Management System) card and trekking permit (for Annapurna area – ACAP – Annapurna Conservation Area Permit).
There are several ways to acquire these 2 documents:
- Tourist Center in Pokhara (Coordinates: 28.198719, 83.969176)
- Tourist Center in Kathmandu (Bhrikutimandap, Pradarshani Marg, ~20 min walk from Thamel)
- Accredited trekking agency if you decide to go with an agency
- At the beginning of the trek in TIMS offices
I’ve seen several trekkers buying permits in TIMS offices at the entrance to Annapurna Conservation Area. I prefer to do it in advance. You can get a free picture in tourist center in Pokhara. In other places, it’s better to come with your pictures.
TIMS Card ensures trekkers safety in general. During the trek, there will be checkpoints in several villages (at least one checkpoint almost every day). This way, it will be easier to identify your location if something happens to you.
In the tourist center, I also got a map of Annapurna Conservation area and detailed map of Annapurna Circuit with kilometers, hours and other information about different villages on the way.
What documents do you need for the Annapurna Circuit permits?
- A questionnaire (you will get it on spot). It’s very generic – your contacts(from your country and Nepal), insurance details(optional), entry/exit dates(approximate) and destinations you intend to visit. If you have any questions, there will be people on the spot who will help you.
- 4 passport-size pictures
- Passport
- Visa
- The fee depends on the area you intend to trek. For Annapurna area, TIMS costs 2000 NPR (~20 USD) and ACAP permit 2000 NPR (~20 USD). This is the price for an individual trekker. Everest base camp costs a bit more. The overall cost for the Mustang area is around 500 USD.
There are discounts for groups, for individual trekkers who register with a porter and for citizens of SAARC countries. The procedure is quite fast and if there are no queues, everything will be ready within 15-20 minutes.
Annapurna Circuit accommodation
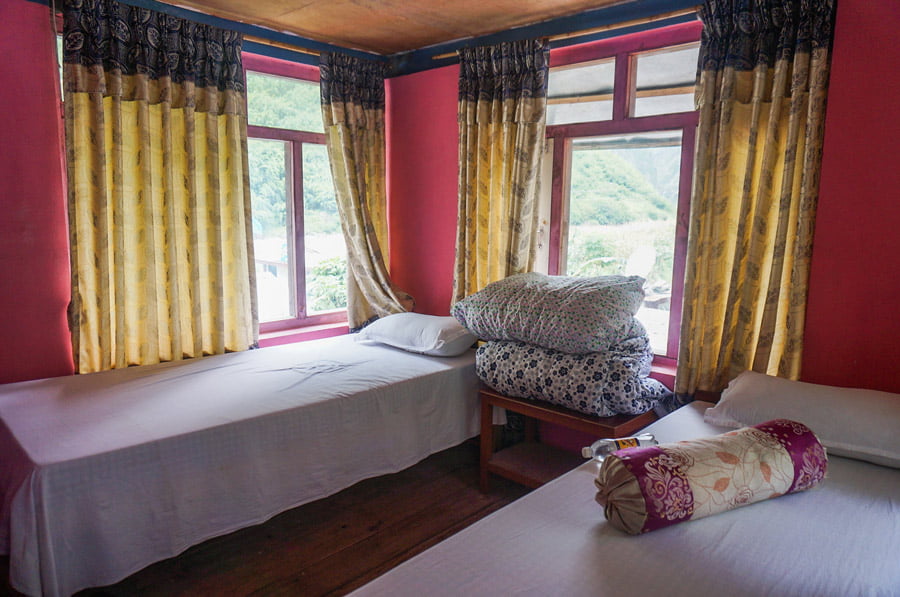
Annapurna Circuit Tea Houses and Hotels are the main types of accommodation on the trek. As a rule, the rooms are well lit, quite small (~3 sq.m) with 2 beds in the room and a common shower and toilet on the floor. You might get offers to stay for free if you buy dinner and breakfast at the guest house.
I strongly suggest starting your daily trek around 6-7 a.m. so you can reach the final destination around 3 p.m. max. Though it matters less in a low season, during the popular months you might be left without accommodation on the higher altitudes or in the smaller villages and you will have to move further or come back.
I suggest checking several options well beyond the first guesthouses. First ones are situated at the entrance to the village and target people who are tired/don’t want to look around. There will be nice guest houses at the beginning, but you will be able to strike better deals with the ones in the second part of the village especially in the low season as quite a few people reach there.
Questions to clarify while choosing accommodation:
Rates. Check what the guest house takes money for. E.g.: shower, charging mobile, extra blanket, drinking water, WiFi, etc. During low season you will be getting most of the mentioned services for free. At the higher altitudes (4000+mts) you will be paying almost for everything. Agree about all the prices in the beginning, otherwise, you will end up spending an unplanned amount of money at the end.
Hot water. Most of the Guest Houses will promise hot water. There can be solar/gas/boiler/bucket hot water. I recommend double checking it. E.g. If the house has a solar shower and it was raining the whole day, there will not be hot water there.
Charging points. If you have something to charge, look for the guest house accordingly. Till 4000 you will find charging points even inside the rooms.
Type of the guest house. I recommend staying in the wooden houses after the altitude 3000+m. There will be holes and wind will be blowing in any type of accommodation, however wood helps to maintain warmth way better than the stone.

If you don’t mind stepping outside your comfort zone for a while and living in a different ambiance, spend a night or more at a host family. There are plenty of villagers who can host you. They will charge much less as you will not get hot water, WiFi and other add-ons the guest houses offer.
You will be living just as a person from the village. Nevertheless, the money you pay will be much meaningful for them and memorable experience for you. By staying in the comfy guesthouses with all the commodities we are missing out of the environment in which local people grow, go to school and live their whole life there. In one day in the host family, you might learn more about the local culture than during the whole trek.
Annapurna Circuit food – Dal Bhat power 24 hour

This phrase I’ve heard in every 2nd hotel on the way. Despite Dal Bhat is a really popular dish due to unlimited refills, I haven’t ordered it even once on the trek. The food menus are controlled by the government. It means that the menus at the same altitudes will have same design and price. After Muktinath, you will see cafes that don’t go according to the system. Maybe, because those parts are visited separately by tourists apart from trekking. Hard to tell. Before Muktinath, the food rule works everywhere.
Before the trek, several people were trying to scare me with small portions and quality of food on the trek. Maybe it was a low season or my expectations, but I can recommend almost every place I’ve stayed for the quality of food and accommodation there.
Though it’s true, that from the 2nd day of the trek, a meal in Himalayan village costs more than in the good cafes of Pokhara and Kathmandu, I found quantities reasonable and all meals were freshly made and tasty. I’ve mentioned all the guest houses I’ve stayed in the itinerary.
After 3000m ask for YAK Cheese. This is the product that is not controlled by the government in all the villages. Sometimes it’s missing in the menu, thus the prices will be regular.
Annapurna Circuit Packing list: what to take with you to trek in Nepal?

Below is the stuff I bought/borrowed for the trek and approximate prices in Nepal. I will write prices in NPR I found in Kathmandu. 1 USD ~ 100-101 NPR. What have I taken with me to the trek:
- Money – you will need to carry sufficient amount of money for the whole trek. Though you will get ATMs in Manang and Jomson, I wouldn’t put high hopes on them. Calculate how much you might need and exchange the cash accordingly. Read more in the cost section.
- Sleeping bag – borrowed. You can buy in Kathmandu starting from 2000 NPR. You will be able to get additional blankets on higher altitudes, but they might not be the cleanest and freshest though.
- Warm (feather) coat – 1400 NPR (I bought a second-hand coat. A new one is around 2000). You will need it mainly for evenings and sleeping on the higher altitudes. During walking, I needed it at Thorong La and during the stay at Tilicho lake.
- Trekking pants – 1000 NPR
- Synthetic T-shirt – 300 NPR
- 2 Cotton T-shirts – mine. Price in Kathmandu (250-400 NPR per piece). I slept in them.
- Raincoat/windstop – borrowed. Price in Kathmandu (700-1200 NPR)
- Raincover for backpack – got mine for 200 NPR in Kathmandu.
- Fleece jumper – mine. Price in Kathmandu (~500-700 NPR)
- Thermo full sleeve plus bottom base layer – mine. Price in Kathmandu – full-sleeve (500-800 NRP), bottom (500 NRP)
- Warm hat – bought in Manang for 300 NPR. You can find starting with 150 NPR at the market. To be honest, it was more useful for sleeping at the higher altitudes, though I also wore it on Thorong La.
- Gloves – mine. I’ve used them just at Thorong La. Price in Kathmandu 150-400 NPR depending on the type.
- Hygiene: 100 ml shampoo, 100 ml shower gel, face gel, hydratating crème (it will be sunny, windy, dusty at times, your skin will need a good hydratation), suncream – 2(SPF30, SPF50); tooth paste, tooth brush, hydratating lip balm, a small pack of wet and dry wipes.
- Glasses with protection – bought in Kathmandu UV400 for 500 NPR. I’ve used them just three times after Upper Pisang (~3700m). It was cloudy at times during trekking in September, but I guess glasses are the must during the season when there is sun and snow at the higher altitudes.
- Baseball hat – bought in Kathmandu for 200 NPR. Common price 300-500 NPR. I’ve seen people walking without the hats, though I prefer to have one in higher temperatures.
- Woolen socks – mine – for evenings and sleeping. 200-300 NPR in Kathmandu.
- Trekking socks – 2 pairs – 200 NPR per pair. You will need 2 pairs because you will be changing them to avoid “smelly” shoes.
- Synthetic scarf – mine. Starts with 300 NPR in Kathmandu. You need something that will cover your neck.
- Cup – bought in Kathmandu for 120 NPR. I was taking hot water for my food.
- Torch – I used the one on my phone. You will need it on the key ascends of the trek: e.g. Tilicho lake, Thorong La, Poon Hill as you will be starting around 4.30-5 a.m. You will need to light your path for an hour or so till the dawn, afterward it will be visible. You will also need a torch to go to the washroom at the higher altitudes.
- Spoon – bought for 60 NPR
- Microfiber towel – 500 NPR. It dries faster and it’s very light.
- Trekking shoes – borrowed. Prices start at 2000 NPR. I recommend buying trekking shoes in advance because you need to “break” them. Blisters are real. Try also to get boots that fix the ankles. On mountainous paths it’s possible to twist your ankle. Alternatively, I’ve seen a few local people walking in sport shoes.
- Flip-flops or sandals for the evening – every day you will be taking off your trekking shoes after walking, thus you will need to change to something. I would go for flip-flops or something similar that you can use for bathroom as well. You will be using public showers; on the higher altitudes, there might be no floor. I wouldn’t take three pairs of shoes in total as every gram matters when you carry your luggage.
- Food & snacks – I’ve taken 2.5 kg of food (12 snickers; 300g papaya dry fruit; 500g dates; 8 fast-made porridge portions; 6 packs maggie; 200 grams dry bread, lime pack(6 pieces); tea (25 bags). I wished I’ve taken more dry fruits rather than snickers. You will need glucose and extra energy while walking. If you like nuts and chocolates – go for snickers, otherwise, find the other ways to raise sugar in your blood. You can buy even a few sets of candies. In Kathmandu you will find plenty of supermarkets, in Pokhara, the biggest one is Bhat Bateni.
- Medical kit for emergencies – this depends on your health. I took the core stuff: bandage and spirit, charcoal from food poisoning, painkiller, and powder from cold. I didn’t need any to be honest, but this basic kit gives you a feeling of security in the middle of nowhere.
- Trekking poles – I borrowed one and found a wooden stick on the way. To be honest, they were an extra load most of the time, but quite helpful while crossing some waterfalls (in September the rivers and waterfalls are increasing in size due to the monsoon season and the pole was helpful in checking stones to step on) and on steep descends to unload the knees.
It’s also good to have a knife with you, though not compulsory. I’ve also had a nail-cutter. You need to keep your nails on feet short and within 2-3 weeks they do grow. I recommend buying everything for trekking in Kathmandu, it will be overall cheaper than in Pokhara.
How to dress-up during Annapurna Circuit trek?
Use many layers while dressing. I walked for the first 2 days in the t-shirt, next 4 days in the base thermal full-sleeve (I was starting almost every day in fleece for the first half an hour till my body warms up), the days before Tilicho and Thorong La I was walking in thermal full-sleeve and fleece, on Tilicho and Thorong La I was wearing all the layers I had except the raincoat (T-shirt, full-sleeve base thermal, fleece, feather coat).
Though I haven’t ever felt cold while walking as I was constantly moving, it is important to combine the layers correctly. Try to avoid cotton and natural fabrics, except woolen socks for sleeping. Synthetic wears keep the sweat outside, while cotton absorbs it.
You always need to keep yourself dry and warm. E.g. If you make a lunch stop or longer break (>10 minutes) while walking, don’t wait till your body will cool down, put an extra layer to keep the warmth.
On higher altitudes, wear a scarf around your neck even if you don’t feel cold. You don’t feel mountain winds when your body is heated up.
Annapurna Circuit itinerary
The beauty of Annapurna Circuit is the close proximity of the villages (~2-4 km). If you get tired earlier or feel like walking more, you can choose the stay accordingly.
Most of the itineraries suggest to skip the beginning part of the trek and drive till Chame. Currently, you can cut up to Manang though I don’t suggest doing so. I’ve also done several side treks which I will mention. You can cut them out and do traditional Annapurna Circuit if you are limited in time or for any other reasons. I also strongly recommend visiting Tilicho Lake if you travel in season. Here is Annapurna Circuit day by day itinerary:
Day one: Besisahar(820m) – Ghermu(1130m)

The classical trek starts at Besisahar where you can reach from Pokhara or Kathmandu. I recommend taking a minibus – it’s a bit faster. In Kathmandu the buses start from the Central bus terminal, in Pokhara from Prithvi Chowk – it’s huge (the coordinates of the bus stop – 28.212376, 83.987521). I’ve left Pokhara at 7.30 in the morning and reached Besisahar by 12.00 with a few jams. Take direct transport. There will be many bus options crossing Besisahar, though the road can take up to 7 hours from Pokhara.
In Besisahar there will be the first tourist check post and entry to the Annapurna Conservation Area. It’s just near the bus station. You need to go out from the bus on the second (last) station in Besisahar, otherwise, you will have to cross the whole town by foot.
Besisahar – Nadi Bazar – I strongly recommend to go this part by bus. It’s 13 km where the transport road coincides with the trail, thus there will be jeeps, buses, a few constructions and quite dusty. The bus costs 300 NPR, Jeep – 700 NPR. I’ve taken a bus at 12.35 and reached Nadi Bazar by 14.00. The bus stops for another check post at Khudi village on the way.
Nadi Bazar – Ghermu. This is around 11 km and 4.5-hour walk. There will be several villages on the way. Till Bahundanda the path will be coinciding sometimes with the road. At Bahundanda there will be first step climb and might feel difficult as for the first day of trekking. There is also one of the check posts. Afterward, there will be several easy descends and climbs. I’ve stopped in Ghermu because it was already 18.30 and it was becoming dark. I’ve stayed in one of the last guest houses at the end of the village. From the one side, there will be the rice fields and mountains, from the other – the waterfall.

Day 2: Ghermu(1130m) – Tal(1700m) – (07.20 – 14.00)
On this day there will be several small side treks – either to the neighboring villages or to the hot springs. There will be the jungle trek to Chamche. Despite numerous options, do estimate your time and efforts. This is just the second day unless you have a basic fitness level, you will be still struggling sometimes to walk in a hot climate. There will be a 30 min ascend before Tal, however, this is one of the most picturesque places on the trail. You will see a few impressive waterfalls, all the time you will be surrounded by high hills. I got a feeling of walking in some fantasy movie. It was so unreal.
Day 3: Tal(1700m) – Chame(2710m) – (07.00 – 16.00)
Today’s route will be: Tal – Darapani – Danaqyu – Timang – Chame. Most of tourists stop either in Danaqyu or Timang. In my opinion, you should reach at least Timang, but if you got enough strength to walk further, go to Chame.
Tal to Darapani is an easy part of the road, there are a few bridges to cross and there is a tourist check post in the village where you should check your permit. Darapani to Danaqyu has a few ascends but overall the path is easy to walk. From Danaqyu to Timang there is quite a long and fairly difficult ascent sometimes by stairs sometimes by path. This is one of the places I got lost.
Just after you exit Danaqyu cross the wooden bridge down from the hill. You can also keep going by road, but all people who went there had to put off their shoes and cross a small waterfall. After the waterfall there are two ways – a steep ascend which you need to take (coordinates 28.528116, 84.31838) and a straight path. I took a straight path which in the end will lead to the same place, but there you will need to cross one small and one huge waterfall. The second one has a bridge made out of branches. I thought I’m not that well balanced to cross that one in the monsoon season and came back to look for the path which I indicated earlier.
In my opinion, this ascend from Timang is the hardest part of the trail this day, so if you still got power to walk and time, continue to Chame. The road there is straight with a few easy and short ascends.
Day 4: Chame(2710m) – Upper Pisang(3310m) (07.00 – 14.00)
This whole day is picturesque and quite an easy walk before you reach Pisang itself. You will be looking at Annapurna from one way or another. The bigger part of the day you will be going either on the road or through the forest path. There are some people who choose to stay in lower Pisang. I would recommend taking that steep climb (~20 min) to the Upper Pisang as the morning views are breathtaking there.
There are plenty of apple gardens in this area, so this is the place to buy apples for cheap. Fruits go really well on the road.
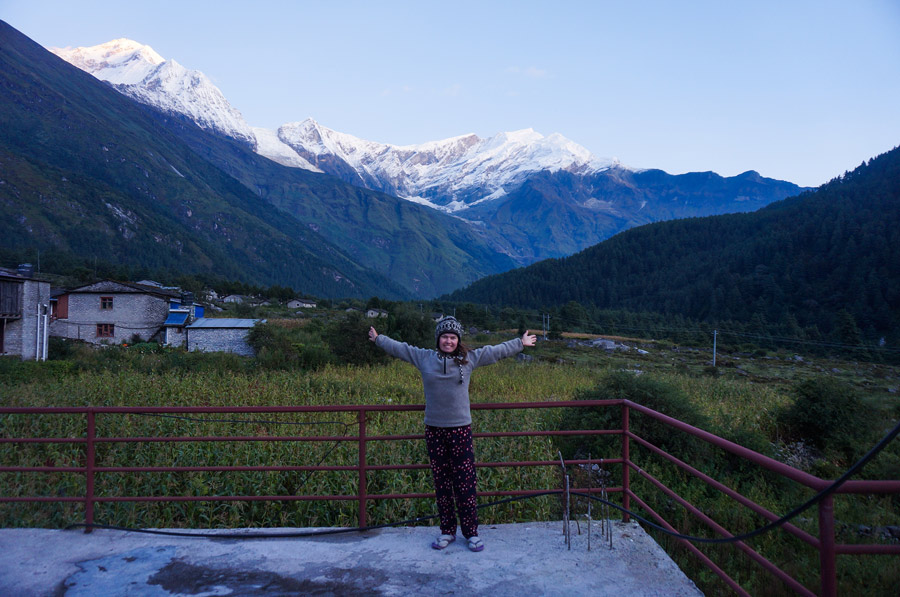
Day 5: Upper Pisang(3310m) – Manang(3540m) (07.00 – 16.00)

There are two ways how you can get from Pisang to Manang – through lower Pisang – the route is shorter and easier, though it goes nearby the airport in Humde. Or you can go through Gyaru and Nagwal – and I recommend to do this. People say that it takes two days to reach Manang through the upper path, though I found it doable in one day. The trekkers who go spend a night in Nagwal don’t stop for one more day in Manang for acclimatization as Nagwal is at the higher altitude.
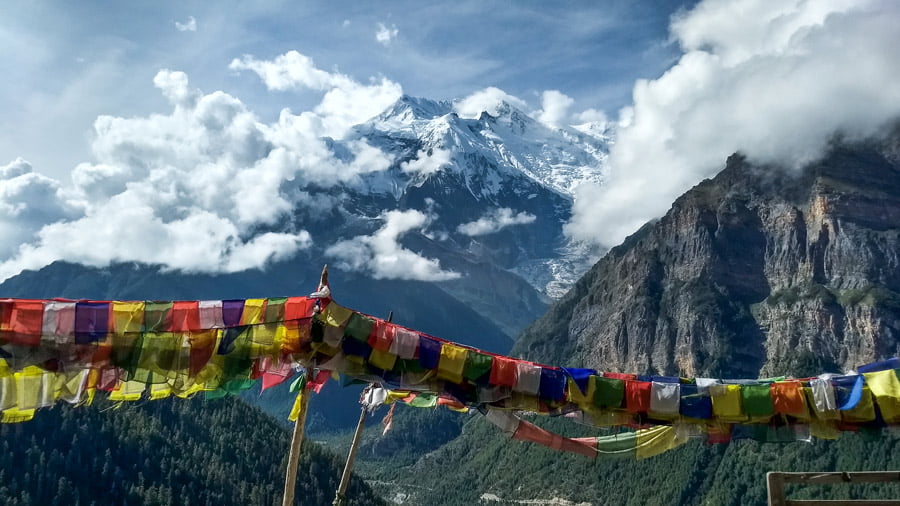
The hardest part of this day, in my opinion, is quite a long and steep climb to Gyaru. At the entrance to the village, you will be rewarded with one of the most breathtaking views. I made a stop there for a masala chai.
The road to Nagwal will have numerous picturesque views from all the sides. In Nagwal you will be passing several impressive monasteries.
The road to Manang is around 3 hours and there is quite an easy descend. You need to follow indicators clearly, otherwise, it’s really easy to turn to Chullu trek from this route. This area is one of the most picturesque on the trek and even if you are lost you will end up being in very beautiful place, however, try to follow the signs. I’ve reached Manang around 4 p.m. though I’ve spent 1 hour in a school in Braga (a neighboring village).
There are plenty of acclimatization walks from Manang. As it was my first serious trek, I was trying to do everything to prevent potential mountain sickness. Normally, people do 1 acclimatization walk. I’ve done 3 out of 6 😀
The same day I went to Gangapurna Lake (it’s an easy 30 minutes walk from Manang) and climbed the hill nearby (30 minutes more from the Lake). There are nice views of Manang from there.
Day 6: Manang(3540m) – Ice Lake (4650m, day trek) – Manang(3540m) (06.30 – 14.30)
If you know in advance that you will be doing Ice Lake, you might consider stopping in Braga (a village before Manang, 30 minutes walk). Though locals tell there is a way to the Ice Lake from Manang, for some reason everyone starts the trek from Braga.
As this will be the highest point you’ve reached so far on the trek, try walking slow not to cut the breath. It’s not a Marathon, remember. There were a few guys who didn’t feel well due to fast speed and altitude changes. Despite the variety of acclimatization walks around Manang, local people suggest the Ice Lake as the top choice.
You might need a day pack to take water and coat with you. You can buy a simple one in Manang or in Kathmandu/Pokhara starting with 300 NPR. I rented out from my host for 100 NPR/day.
After Manang starts the time when you are slowing down and enjoying more frequent breaks and the tea stops in the cafes. From now onwards, your days will be measured rather in altitude gained than in km passed.
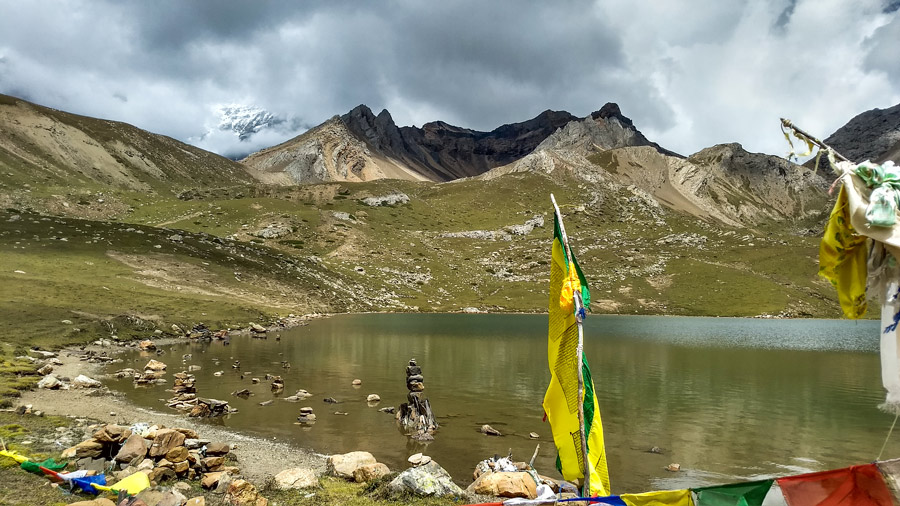
NOTE: Tilicho Lake is one of my favorite parts of the whole trek and I recommend it, however, if you don’t have 3 days extra to complete this part, you need to go from Manang to Letdar directly. If you skip Tilicho trek, proceed to the day 10. But just in case you change your mind, I’m leaving a picture teaser 🙂
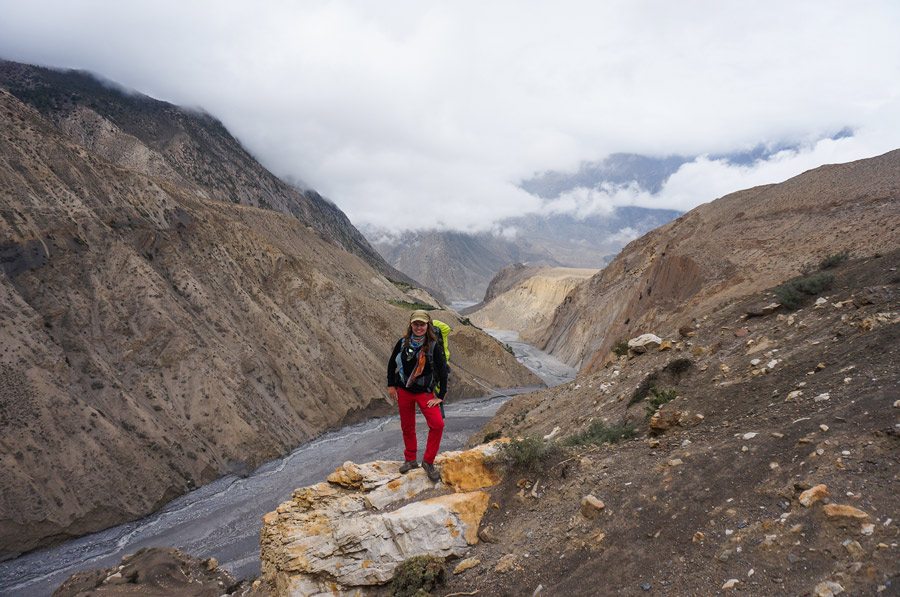
Day 7: Manang(3540m) – Tilicho Base Camp (4150m) (06.50 – 15.30)
This day you will cross Khangsar village, Shree Kharka and quite a challenging landslide path to the Tilicho Lake Base Camp. Shree Kharka is the last village where you will find electricity. At the Base Camp there are only solar panels and alternative energy, thus be ready to pay there for the commodities (shower, charging points, etc).
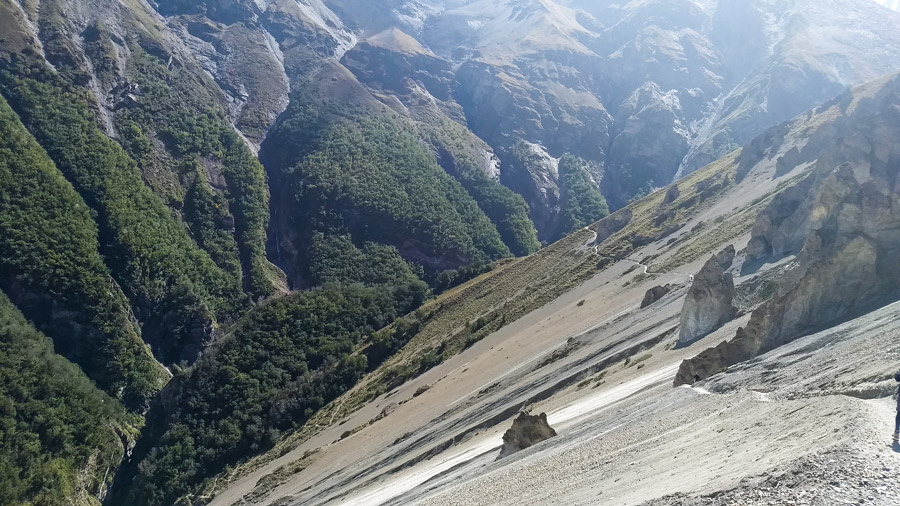
Make a longer break in Shree Kharka as afterwards, you will have to cross quite a long landslide area with a few possibilities to stop for a short break. Though it is a challenging trail and I even met people who decided not to go further through it and return, I found the path not that scary as on the pictures and reviews. There is the upper and lower trails. The upper path has a huge height gain and it was closed during September. Local people recommend the lower trail.

I think I’ve stayed too long in Shree Kharka – during high season, you might need to be faster as there are only two (but big) guest houses in the base camp.
Once you reach the Base Camp, take an hour rest and climb one of the nearest hills to gain 200m as an evening walk for acclimatization purposes.
Day 8: Tilicho Base Camp (4150m) – Tilicho (4919m, day trek) – Tilicho Base Camp (4150m) – Shree Kharka (4100m)
Try to start trek to Tilicho lake not later than 05.30 a.m. as closer to the lunch there are clouds gathering in the mountains. In my opinion, this is the most difficult part of the trek. It is a steep climb for 2.5 hr and then a half an hour walk on a straight path to the lake. It was very misty in the day of the climb, so all the group from the Base Camp was climbing with no idea where we are going. I could hardly see anything 20 meters before and after me.
After you climb the hill, there is a straight and very picturesque road to the lake. There will be snowy peaks on your left. Sometimes you will hear the snow crunching at the top of the mountains.
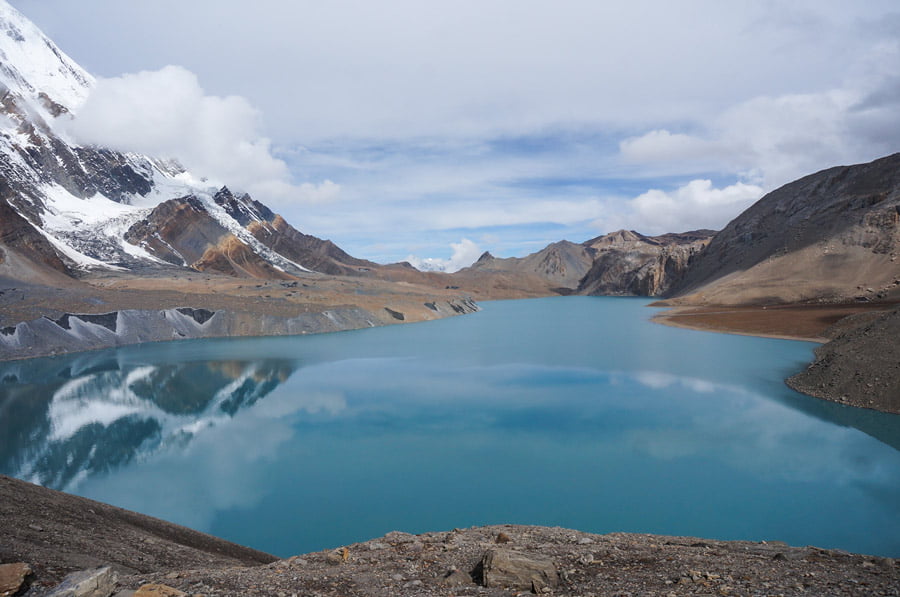
The lake was the most surreal view I’ve seen. I spent around one hour just walking in that area and watching the lake. Nevertheless, don’t stay too long to avoid headaches and mountain sickness. It’s 4900m.
If you are doing only Tilicho trek without going to Thorong La, there is a pass from Tilicho to Jomsom. Several people who climbed to the lake, went further with their backpacks, though locals strongly recommend not to go on those paths without a guide. During several months of the year, those roads are closed because of the snow.
After descending from Tilicho Lake, I took lunch and moved further to Shree Kharka. Many people stayed in the Base camp for one more night. I left for several reasons – Shree Kharka is a bit cheaper than the base camp and I wanted to unload the next day of the trek. It takes around 3 hours(together with breaks) from the Base Camp to Shree Kharka.
Day 9: Shree Kharka(4100m) – Letdar (4200m) (07.50 – 14.00)

This is a relatively easy day with many picturesque scenes. You will cross the Upper Khangsar which looks like the lost world with unreal sceneries, then you will see Manang once again from the top of the hill and make a turn to Yak Kharka with numerous yaks and sheep on the hills.
I took an hour break in Yak Kharka for lunch and went further to Letdar. There are 3 guest houses in Letdar, I stayed in the last one as the first one offered only hot water in the buckets. After a nap in Letdar, I’ve climbed a neighboring hill as an acclimatization walk.
This day was quite short and I could continue trek to Thorong Phedi. I had a good acclimatization after Tilicho and Ice Lake, however I haven’t gone further as I wanted to cross Thorong La from the High Camp.
Yak Kharka or Letdar?
Many most of the people go from Manang to Yak Kharka. If you have done one of the acclimatization walks in Manang to 4000+m and feel well by the time you reach Yak Kharka, I recommend to continue the trek to Letdar. It’s just 1 hour away from Yak Kharka, however it has 150m higher elevation. Here is the logic:
Manang (3540m) -> Yak Kharka (4050m) ->Letdar (4200m) ->Thorong Phedi (4450m) ->High Camp (4850m)
If you haven’t gone to Tilicho Lake, it will be difficult to trek from Yak Kharka to High Camp in one day. It’s an 800m altitude gain after 4000m and most of the sane guidebooks and guides will warn you not to do that as it’s a shortcut to the mountain sickness.

Trekkers who stay in Yak Kharka walk till Thorong Phedi next day, as a rule. This is a great balance from the point of altitude, however it will be a very hectic day from Thorong Phedi to Muktinath.
The trail from Thorong Phedi to the High Camp is the second most difficult climb after Tilicho. There is almost a 45 degrees steep 1-hour climb till the High Camp. I wouldn’t recommend starting the day with it. The trek from the High Camp to Muktinath already takes 6 hours and starts at 4.30 am in the morning. It will be quite hectic adding Thorong Phedi part there as well.
In my opinion, the best scenario is staying in Letdar(4200m), then going to High Camp (4850m) next day, then on the third day crossing Thorong La to Muktinath (3800m).
Day 10: Letdar (4200m) – High Camp (4850m) (08.00 – 11.45)
This was one of the shortest yet challenging days. There is a 2 hour trek from Letdar to Thorong Phedi with a small landslide area. I reached Thorong Phedi by 10 a.m. I’ve spent half an hour in the lower camp for acclimatization, then climbed 100m to the upper camp and spent half an hour more there.
Overall it was just 3 hours of trekking this day, however, it might have felt more difficult because of the drizzling rain during the climb from Thorong Phedi to Annapurna Circuit High Camp and the altitude also was reminding about itself.
Once I reached to the High Camp, I slept for an hour or so as I felt powerless. There I’ve met several trekkers from the previous villages. After 1 week of trekking you gain some feel of the community as you will be meeting several people numerous times throughout the trek and the High Camp is the “meeting point” as there is just one guest house. It has several buildings though spread between the hills.
Keep this day slow and relaxed. Socialize for a while in the dining area and sleep no later than 9 p.m. You will need to wake up early the next day, thus plan your evening accordingly. If you are traveling solo, talk to the trekkers when they are planning to start the climb next morning and join one of the first groups.
Day 11: High Camp (4850m) – Thorong La(5416m) – Muktinath(3800m) (05.00 – 10.30)
Wake up around 4 a.m. to leave on time. There were many people who preordered breakfast last evening, I’ve chosen to eat a snickers and tea. If you feel you need something more substantial, you need to preorder it too as you can maximum get a cup of tea in the canteen before 6 a.m. Don’t forget to dress in layers. I was wearing all the clothes I had in my backpack on this climb.
The climb to Thorong La is not hard compared to Thorong Phedi, it takes around 2.5 hours of a slow walk with gradual ascends. Most of the people feel the altitude after 5000m in one way or another. It was also continuously snowing since the morning the day I was climbing. Despite the frequent indicators on the road, we had to make our path through the snow. Local people suggest reaching Thorong La before 11 a.m. during the autumn season because there are strong winds blowing afterward.
Once you reach Thorong La you will see a sign of 5416m and everyone will be congratulating each other. Thorong La is the highest point in Annapurna Circuit. Take a few pictures as you are almost at the “Top of the World”. If you feel cold, drink a cup of the most expensive tea in the name of your achievement. There are two tea houses at the pass, one of them was not working in September.
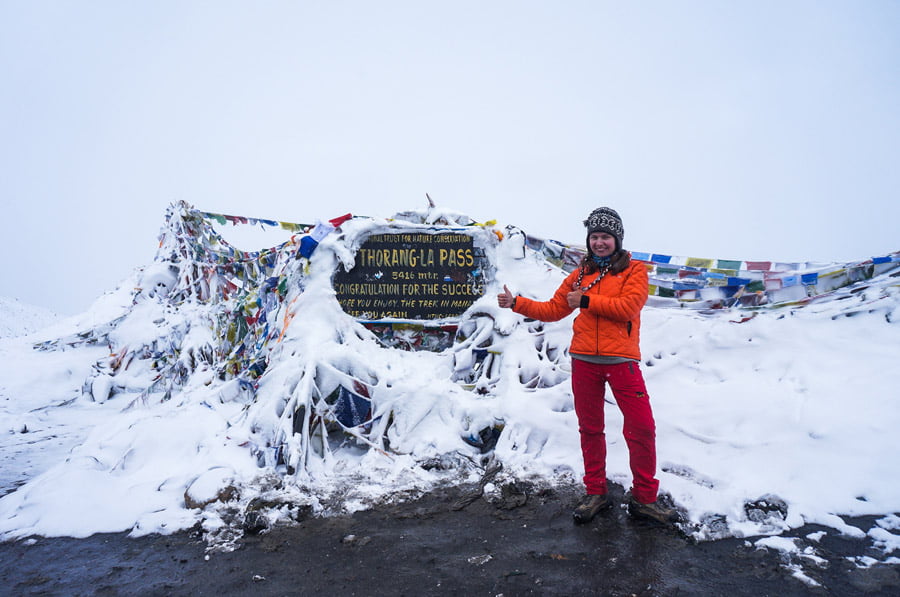
Even if you feel all right, don’t stay longer than half an hour at the pass. My friend got a strong headache for hanging out there too long. Remember, there is a steep 2 hour descend afterward. Your knees will be feeling every single step of it, you don’t want to add your headache to that picture.
Just after the pass, you will see the view of the Mustang Valley. On the way to Muktinath, there will be a few cafes and tea houses, some of them are transforming into the guest houses now. Take a break there if you feel tired, however, reach Muktinath for the night. It’s a big and quite happening village. Here you will get guest houses with charging points, hot water, and all amenities. The best part: you will not be charged for them. It’s quite unusual after you spend a few days on a high altitude, where you have to pay literally for everything.
There is a checkpoint in Muktinath where you need to check your permit. From Muktinath there is already a proper road to Jomsom(700 NPR by Jeep), however, there is a separate trekking path as well.
Day 12: Muktinath (3800) – Lupra – Marpha (2670m) – (07.50 – 15.00)
From Muktinath there are so many ways to continue the trek. From here starts a trek to Upper Mustang (you need a special permit to that area that costs around 500 USD). It’s one of the most preserved areas of the world which was opened to tourists only by the end of the 20th century. You can encounter there people speaking traditional Tibetan languages and Tibetan culture. This area is also called a “Hidden Kingdom” of Mustang.
Continuing on Annapurna trek, you can reach Jomsom either through Kagbeni or Lupra. I don’t recommend taking the straight Jeep road. There is no sense to move on that road. Both Kagbeni and Lupra have beautiful views of Mustang. I’ve chosen Lupra. It’s a 3.5 hr walk from Muktinath.
Mustang has its own charm in deserted mountains and valleys. After climbing a few hills, you will cross several viewpoints of the villages in the valley. From Lupra, there start apple gardens. After 1 week in the higher altitudes, you will be craving for fruits and vegetables. This is the right point to start.

There is a 2 hr trek from Lupra to Jomsom, but in my case, it was 1 hour longer because of the several landslides. Some of the paths have literally vanished so it took a bit of time to find an alternative way. It’s good I’ve met here a few people I’ve been trekking for the past few days with. On a certain point, we were choosing whether to cross the river current or to climb the hill without the trekking paths on it.
Moreover, the rain started that made things a bit more complicated. When you reach Thorong La – everyone is congratulating you and people are so happy. I wish someone congratulate me once I reached Jomsom from Lupra because that was really a hardcore trekking. Nevertheless, you will not face the same issue here. Any landslide issues get resolved within 1-2 days, so I’m sure there was already paved an alternative path there.
In Jomsom, you will find an airport, from where you can fly to Pokhara in 100 USD or so. There are also Jeeps to Tatopani that cost 1500-2000 NPR. If you have time, keep walking, there will be some more picturesque views and villages. There is one hour trek from Jomsom to Marpha or you can reach there by bus for 100 NPR.
I recommend taking this extra effort and reach Marpha. Jomsom is a big point of “civilization”, where you get public transport, roads, market, shops, banks and other elements of the town. Marpha is one of the most picturesque villages with white houses and wooden windows, small streets, temples and of course apple gardens. Marpha is famous for its apples. Here you will find cider, homemade juice from apples and apricots, jams and other products made from apples. I recommend trying a baked apple crunch pie there.

Day 13: Marpha (2670m) – Kalopani/Lete (2535m) (8.45 – 16.30)
Today the itinerary is Marpha – Tukuche – Sauru – Kokhethani – Kalopani. Despite many guide books advise finishing the Annapurna trek in Jomsom, I can definitely say that this is one of my favorite trekking days and I don’t recommend skipping it. Once I thought I’ve seen enough of the mountain landscapes for 2 weeks, here comes the river valley surrounded by green hills. This part looks like a fairy tale. It is so not popular that in some of the villages people were surprised to see the tourists there. I’ve met only 4 other trekkers for the whole day.
After Muktinath, I got quite relaxed and my days were starting after 8 a.m. Once you leave Marpha you will see a small bridge to the other side of the river. You need to cross it and continue on the trekking path, otherwise, you will be stuck on the road with jeeps and buses. After the bridge, there starts a picturesque park with a few views of the snowy peaks.
It takes two hours to reach from Marpha to Tukuche. To visit Tukuche you need to cross the river. The current was too strong after the monsoon season, thus I continued trek on the left side to further villages.

The road to Sauru is one of the most complex, because there is no road, but basically stones. There are a few symbolical “bridges” made from branches by the villagers. There is also a steep climb of the hill and then descend from it. From Sauru to Kokhethani there is a path that almost always goes near the river. You will cross several meadows with horses and sheep on the way. It’s a one hour trek. Before entering Kokhethani you can cross the bridge if you wish to take a jeep/bus. Next possibility to do so will be in Kalopani.
I went further on the trekking path and made a stop for lunch in Kokethani. There was a lonely guesthouse and a café there. Food was good. It took 1.5hr to reach by foot to Kalopani. The trekking path was quite easy and straight with a few descents. There were two side treks on the way to a hidden lake and a village. I’ve thought I had enough of the mountain lakes in the past two weeks so I went straight to Kalopani.
Before Kalopani you will need to cross the bridge to another side. At the entrance of the villages, you will see a few luxurious hotels, which I would dare to call even palaces. Even the small guest houses were charging 500 NPR for a room and selling quite expensive food which was unreasonable at all. Considering that even on higher altitudes I was keeping my budget within 1000 NPR (~10 USD)/day where you pay for almost everything, I moved further to the neighboring village Lete.

Several guest houses were closed because of the low season. Almost at the end of the village, I found a place run by a mother and two daughters. They don’t have a wifi or menu, but they hosted me for 200 NPR. There I’ve also taken the best masala chai on the trek. And it was 50 NPR. Generally, the prices on the food were so reasonable that I didn’t understand why people choose to stop in Kalopani.
There is a checkpost in Kalopani, but at that point, police told it’s optional to check your permit here. Maybe because most of the people skip this part of the trek at all.
Day 14: Kalopani (2535m) – Tatopani (1200m) (06.45 – 13.00)
This was the part I was planning to go by bus as it already gets quite hot and humid at this altitude. There are buses and jeeps leaving from Ghasa to Tatopani. Ghasa is a 1.5-hour walk from Lete. There is also a tourist checkpost there.
There were two landslides during my trek that’s why the transport was suspended for the whole day. Nevertheless, there is always an alternative walking path on the left side of the river. There will be some impressive waterfalls and lush green scenery. Starting from 10 am the heat was the main issue. I crossed the bridge to the walking path after Ghasa. On the way, you will cross Myagdi village with a bit tough descend – there are uneven stairs.

It took me 3 hours to reach from Myagdi to Tatopani, but on the way I stopped for a lunch. Outside of Tatopani there is a checkpost where you need to mark your permit. Before the hot springs there is a local check post, 5 minutes walk after the hot springs there is a tourist check post. You need the second one.
Many people advertise these hot springs, though it’s a cemented area filled with water which overlooks river and the road.
Note: If you are short in time, you can go from Tatopani to Beni and exit to Pokhara. I went further for the Poon Hill Trek. After the Annapurna Circuit you will be well prepared and acclimatized enough to do it in 2 days. The maximum height you will reach is 3200m which will be quite habitual to you. Normally, people split this trek into 4-5 days.
If you want to proceed to the Poon Hill trek, you need to cross the bridge to the other side of the river after exiting Tatopani. From there starts a side trek.
I felt I wanted to escape the heat, so I continued trekking to the Poon Hill, but I do not recommend doing it if you walk by foot from Kalopani. This is a huge distance for one day.

Day 15: Tatopani (1200m) – Ghorepani (2870m)
If Annapurna Circuit was more about nature till now, the Poon Hill part is more about the village tourism. There are many more villages you cross on the way to the top and most of them are simple non-touristy villages where you can see how people live. I had a few random conversations with the local people about the villages and their work. People were genuinely friendly and interested to talk.
After Annapurna Circuit I would rate Poon Hill as an easy trek. Its hardest part is the stair path. You will have to climb thousands of stair steps to reach to the top. The regular trek starts from Nayapul through Tikhedhunga to Ghorepani. I found the ascend from Tatopani more even and regular than from the other side.
I reached Ghorepani around noon. After the past 2 chaotic days with landslides and climbs, I took the time to wash some of the clothes, take proper rest and talk to the guesthouse owner about the Poon Hill. Try to sleep no later than 9 p.m. as you have to wake up early next day.
Day 16: Ghorepani (2870m) – Poon Hill (3200m) – Ghorepani (2870m) – Nayapul (1070m) – Pokhara (05.00 – 16.00)

I woke up around 4 a.m. and saw unbelievably starry sky outside. Try to wake up around 4.30 a.m. so you can leave around 5 a.m. It takes around 30 minutes to climb to the Poon Hill from Ghorepani. Take only water and a warm coat if you plan to stay longer at the top. The entrance to the Poon Hill costs 50 NPR.
From the Poon Hill you can see Dhaulaghiri, Annapurna Range and a few other peaks in an amazing panorama. The clouds start coming after 7.30 a.m. I’ve spent around 1.5 hour watching the snowy peaks for the last time and then descended back to Ghorepani.
You can add one more day to the trek from Ghorepani to Gandruk through Tadapani. I think it totally makes sense if you are trekking in spring as there will be rhododendrons blossoming everywhere. In autumn, it will be another picturesque village only.
The descend from Ghorepani to Nayapul is very uneven. I could feel my knees for the whole week after these stairs. In my opinion, it wouldn’t be so tiring, if the weather was less hot. There is an option to take Jeep to Nayapul from Ghorepani itself or from Hile or further villages.
From Nayapul there are frequent buses to Pokhara or if you find a company, you can also share a taxi, it comes almost for the same price.
AMS, HACE and how to avoid mountain sickness during Annapurna Circuit

This was my top fear while starting a trek, because this was an unknown area for me and it’s quite human to be scared of unknown. The truth is, you will see people turning down because of the sickness. Moreover, people die of mountain sickness. Nevertheless, if you do proper acclimatization, you have all chances to experience close to none effects of the AMS and pass the whole trek without taking altitude pills.
The mountain sickness occurs when you rapidly ascend, your organism doesn’t have enough time for adaptation, the oxygen rapidly decreases, thus brings all the consequences.
For some reason most of the medical articles on google are scary. The fact is that you really need to stop self-diagnosing yourself according to google. Always put content into the context and consult doctors if possible or local people in other cases if you identify any symptoms. Local people have literally seen 1000s of foreigners crossing their villages and you will not be the first person to face a certain situation.
Another fact is, people who had experienced AMS, didn’t get it all of a sudden abruptly. It’s a progressing sickness with very evident symptoms. There is almost NO CHANCE you will skip it through.
When I tell about content and context, here are a few examples where you need a bit of critical thinking:
Sleeping: You will hear most of people online telling you will “sleep like a baby” during the trek as you will be walking a lot and getting physically tired. The fact is, if you have a thin and disturbing sleep in your daily life, you might have the same during the trek and it’s not a symptom of the AMS if you take it apart from the big picture. I had two almost sleepless nights during the first week, however that was rather caused by the accumulated stress in my life.
As a result, also comes tiredness. If you don’t get enough proper sleep, you will be tired, however, it is not necessarily related to the mountain sickness, but rather emotional setting.

Swelling hands: My hand fingers have increased in size after Chame (2600 m). Nevertheless, it was because I always kept my hands down plus, the day before, my hips and chest were aching a bit from the weight of the backpack, thus I put a bit of load on my arms. This has also contributed to the swelling.
Loss of appetite: If you normally have late breakfasts or skip them, chances are your organism will not adjust from the first days to a different schedule.
Headaches: most of the people experience headaches during climate/weather/pressure/altitude change.
The symptoms above together with a few others tell about upcoming AMS, however, you always need to see a big picture as some of them might be the consequence of your unhealthy lifestyle. I highly don’t recommend drinking pills to kill the headache. You might not notice the progressing disease.
Local people always advise a “sleep test”. After sleeping and drinking water, your headache, tiredness and several other symptoms go as a rule. If they are progressing, consult the doctor – you might have to descend to a lower altitude till you feel better.
Take your time. After the first week of the trek your regime will totally change. Before the trek, I used to sleep by 1 a.m. and wake up by 8 a.m., eat randomly whenever hungry, spend 12 hours a day in front of my laptop.
After the first week by 8 p.m. sharp I was in bed, I was awake by 5.30 a.m., light breakfast at 6.30 a.m., 1 hour sleep at lunch at higher altitudes, huge portion of dinner. The problem happens that it takes around 1 week to adapt to this new trekking schedule. Nevertheless, by 3rd or 4th day of the trek you will be reaching 3000m of altitude already and, despite it’s a normal altitude, most of people haven’t experienced it before and whatever occurs during this first week of adaptation they start self-diagnosing as a symptom of AMS and panicking.

In addition to this, whatever health problems you have will become more evident at the higher altitudes. Your heart will be beating faster while reaching higher altitudes to produce more blood, your mind will be working a bit slower as most of the energy will be given to your body.
Are you a panic freak as me? I did 3 check-ups daily during the first week till I learned to differentiate the symptoms from consequences. I used to check-up pulse (that’s individual, on higher altitudes I used to have 115 beats/pm in the evening, by the morning it used to be around 80 as during the night the organism adjusted); touched the nose tip with my finger while eyes closed and walk on the straight line.
How to avoid mountain sickness during Annapurna Circuit trek?
There are three rules which will help you avoid most of the problems during the trek: eat well, drink more and sleep well. Except that some specific steps:
Drink a lot of water
In Annapurna Circuit you will be crossing numerous climate zones and while it’s quite easy to drink 2-3 litres in the exhausting heat on low altitudes that becomes tougher in the cold weather while climbing up. On the higher altitudes, naturally organism starts urinating more.
How much you should drink? I wouldn’t put an exact number. The rule of thumb: if you are drinking a lot, but urinating 1-2 times a day, you are not drinking enough. It means the liquid you drank went only on recovering the lost liquid from your organism while walking.
Walk high, sleep low
Once crossing 3000 altitude, make acclimatization walks in the evenings. E.g. climb the opposite hill to gain 200-300m, stay for a half an hour to breathe the thinner air and come back on your altitude to sleep. At night your organism will adapt better. Otherwise, try to take upper paths while walking and then descend to lower altitudes to sleep.

Sleep more
The fact is you will not want to sleep more if you are used to a certain schedule in real life. You need to literally force yourself to sleep during day time and go to bed earlier from the first days. During the sleep, the organism adapts to the new environment faster.
Add maximum 500m per day after 3500m
The higher you go, the thinner is the air and your body needs some time to adapt to it. The best adaption is during sleeping. Till 3000m is considered a safe distance (I still wouldn’t recommend gaining all the altitude in 1 day).
Exclude electronics to the maximum
Trek is a time when your body will have an irregular physical exhaustion, so you need to invest all your energy into the physical activity. Don’t put an extra stress by checking work mails and performing other tasks that create a mind pressure. Take 2 weeks off and catch-up with all the pending work afterward. Try to limit also yourself from the information consumption during the first days till you adapt to the trekking schedule. During the trek all your primary focus is on your body – till your mind becomes blank.
P.S. The two weeks of trekking did an immense clear-up of my brain from the issues that have been there for years. I haven’t had such a sound sleep in the past 5 years as after this trek.
Add food elements that prevent sickness
Local people recommend garlic soup and ginger tea as a prophylactic from the AMS. I was so scared to get AMS that I’ve undertaken many possible measures to prevent it, thus it’s hard to estimate what helped and what didn’t. Nevertheless, I’ve descended from Thorong La with a light head.

Annapurna Circuit cost
In this chapter, you can calculate an approximate Annapurna Circuit budget depending on your preferences and necessities. Let’s break up the budget:
Clothes & equipment: I mentioned detailed pricing of equipment in Kathmandu in the packing list above.
Accommodation & Food: Food price till Muktinath at least is defined by the government. That means whichever guest you will approach at the same altitude, you will see almost the same menu design and prices. The only difference will be in accommodation conditions: e.g. room price, wifi, hot/cold shower, etc. Here are some of the menus from the different altitudes of the trek, so you can estimate your daily expenses:
- Ghermu – 1130m
- Tal – 1700m
- Chame – 2710m
- Pisang – 3300m
- Manang – 3540m
- Tilicho Base Camp – 4150m
- Shree Kharka – 4100m – The menu design and choice was absolutely the same as in the Base Camp but the prices were 20-50 NPR cheaper.
- Yak Kharka – 4050m
- Letdar – 4200m
- Thorong Phedi– 4450m
- High Camp – 4850m
- Muktinath – 3800m
- Marpha – 2670m
- Kokhethani – 2525m
- Ghorepani – 2870m
Organizational expenses: permits (4000 NPR individual foreigner trekkers; citizens of SAARC countries may avail discounts).
Annapurna Circuit Transport:
- Pokhara – Besisahar – 500 NPR direct minibus
- Besisahar – Nandi Bazaar – 300 NPR Bus (700 NPR Jeep)
- Nayapul – Pokhara – 300 NPR taxi (250 NPR bus)

Above are the main destinations. You can also cut the parts of the trek. On the lower altitudes, 1 day of walking (13-20km) costs around 700-1000 NPR by Jeep. The higher you climb, the more expensive is the price for the transport. After Manang and before Jomsom there is no transportation at all (only helicopters). In case of emergency, the helicopter costs 2500 USD.
How much did I spend on Annapurna Circuit and Tilicho?
- Permits – 4000 NPR
- Accommodation & Food on the trek – 9800 NPR (I have financially relaxed after the High Camp and decided to enjoy local delicacies/bakery/etc. But remember, I’ve carried 2.5 kg food with me from Pokhara, which significantly decreased my expenses)
- Transport – 1200 NPR
- Bhat Bateni (supermarket) food for the trek – 1320 NPR
- Trekking equipment & clothes – 5100 NPR
Overall: 16320 NPR + 5100 NPR for trekking equipment. The last sum depends on what stuff you already have for the trek. I have been trekking 16 days, out of which 7 days I’ve been in the higher altitudes (3500m+). The lower is the altitude the cheaper are the prices.
How to save money on Annapurna Circuit trek?
If you are traveling on a budget, there are several ways how you can cut the expenses of the trek:
Come in a low season. In September you can easily get rooms for 100-200 NPR or even for free, though the room price in the menu sometimes reaches 300-400 NPR. On the higher altitudes, you might also negotiate and cut prices on charging points and shower.
Bring your tea and lime. The higher you go, the more expensive the tea becomes. On 4000+ altitudes one masala tea can cost over 100 NPR. There is almost always hot water in the menu that is quite cheap. You can save money and make the tea yourself.
Choose to pay for accommodation rather than taking all the food. Quite often you will get deals on free rooms if you buy all the food from the guest house. Rooms cost cheaper than the food after the first two days of trekking. I was happy about the food quality everywhere I’ve stayed. At the same time, I’ve met a few trekkers who complained about small portions or taste of certain dishes. Think of it from another perspective, if you pay 100-300 NPR per basic room – it’s a price set by locals and kind of a good deal for hosts.
I’ve shared a room with a friend in Pokhara for a total cost of 400 INR. It had a lake view, free WiFi, and a private bathroom. You pay almost the same money in the local village for fewer commodities. You will mostly get very nice people who will rent you rooms in the mountain areas, however, you need to spend money wisely.
I was always taking dinners at the guest house, for breakfast I was taking the hot water and used my food.
Take Dal Bhat when you are very hungry. In North India, it’s called combo and in South India – Thali. Dal Bhat is a combo meal which consists of a plate of rice, dal (pulses), cooked vegetables. At the lower altitudes, you might get a few pieces of the fresh vegetables extra. You can ask for unlimited refills of everything till you get full. Normally it costs more expensive than other items in the menu, but if you are really hungry – that’s a way out.
Drinking water. There are safe drinking water stations in different villages on the trek, where you can buy water from 30 to 80 NPR/liter depending on the altitude. I was drinking tap water during the whole trek (NOT FROM THE GUEST HOUSE). There are several drinking taps in each village where local people source water from the mountains.
You need to confirm with the local people that it’s drinking water. My logic behind it was the following – local people drink it, I can drink it. I’ve seen plenty of foreigners with some filters, tablets, sanitizing water sprays, etc. You need to decide it for yourself.
I’ve seen people also sourcing water from the waterfalls. If you are tending to go that much nature-oriented, I would take water from the ground falls where it gets filtered by earth. In waterfalls, especially in the monsoon season, you get rain and you don’t always know where it starts.
Last notes about the Annapurna Circuit

Put away all the doubts. If you always wanted to do the trek, but couldn’t find the right time – now is the right time. I wasn’t planning to do this trek and also did it because my friend who has completed it a few years back had inspired me to do so. This trek ended up being one of the most memorable experiences where I’ve discovered something new about myself and my capabilities as well. YES, you can – just do it!
Keep your plastic and non-disposable garbage always with you. This trek is in the conservation area, far away from civilization. You came here for breathtaking views, pristine nature, waterfalls, and mountains. You will take to the trek plenty of chocolates, sweets and other plastic items. Take an extra packet and keep all the plastic garbage in one place till you reach Pokhara. If you have too much garbage, dispose it before the altitude 3000m. Keep always one bottle of water which you will be refilling. If you bought an extra bottle, crush it and keep it in your backpack. It’s hardly 50 grams.
DON’T THROW YOUR GARBAGE ON THE WALKING PATH. No one will ever clean it after you. At the same time, be a responsible tourist. If you see a can somewhere or a plastic bottle on the higher altitudes, just pick it up till you reach the next big village. Himalaya is one of the most beautiful areas in the world. Let’s keep it clean to save it for future generations!

This is my longest post till date, ~ 11600 words. I tried to put up here everything I wish I knew before my trek. If you still have any questions, feel free to drop a comment, I will be happy to help you out!
Have a great trek!
THANK YOU SO MUCH FOR THE POST ! My friend and I are following your itinerary to the tee!! Really appreciate!!!!!! Will let you know how it goes ! 🙂
Thank you for your feedback, Kim! I’m happy you found it useful 🙂
Have a great adventure and I will be curious to know how it goes!
I am really grateful for the post. I am going to make AC and Tilicho lake on Mid-May. Are you recommend anything? I am worried about snow on the way at that time.
Thank you for reading, Linh! I haven’t done AC in May, so I can only share my experience from other treks I’ve done in Himalaya in May.
May is going to be warm and a bit humid on lower altitudes (as it is a pre-monsoon season in South Asia). At the same time, I found May colder on the altitude 4000+m than September (when I did AC and Tilicho), so take warm clothes (e.g. coat, fleece, therm; layers are the key to keep yourself warm). There was still snow after 4500m.
On the other hand, my friend did AC at the end of April and there was snow only at Thorong La. So it really depends I guess)
Hope it helps somehow. Have a great trek!
I am so grateful for your post! I’m arriving tomorrow in Kathmandu and your post is just everything that I need. I’ve seen lots of stuff but yours is the best by far. It’s gonna be my pocket guide. haha Thanks very much for sharing it with us!
Thank you for reading and feedback, Andre! I’m happy you found this guide useful) Wish you a great trip in Nepal! Feel free to share your experience afterward if you’d like
Hi Natalia
What time did you take this trip on your post ?
I’m have a plan go to AC in mid-november, 2019 and finish when the first week of december, 2019.
Is that a good time ? is it too cold, too rain and snow, is the sky clear ?
Do you have any advice for me ?.
Thanks So much 😀
I have done the trek in September, Ngoc. October – November is by far the most popular time for trekking AC, but by the end of November, the crowd starts decreasing. It is a dry season, so there will not be rain (if we are talking about monsoons). On the higher altitudes (e.g. 4500m+) the weather is moody. It was snowing in High Camp and Thorong La even in September (you can see on some pics in the post).
During sunny days, it’s comfortable to walk, but nights are always cold (since there is no heating in the tea houses), so I recommend taking enough warm clothes and a coat with wind protection. A good sleeping bag was a savior for me in Tilicho and after Manang. On 4000m+ I was sleeping almost in all the clothes layers I had.
In addition to warm clothes, consider that the days are shorter in November, so try to start your day early.
Wish you a great trekking experience!
It is one of the most interesting and comprehensive posts I had ever read. Love your easy story-telling style. It is also very informative. Reading your blog makes me feel I can do anything and everything without much to worry about. I learned about price, budget, safety, people, responsibility and so much more than expected. Thank you so very very very much. Love it.
Thank you for reading and feedback, Cassidy! I’m happy this post helped in planning your trek! Have a great experience and feel free to share how it goes 🙂
Thank you Natalia for that thorough post, very useful. My gf and I are planning to do pretty much the same route, also in September (7th-22nd). We have read many stories about trekking during the monsoon but you don´t mention any problems with the rain, leeches or muddy tracks, how was your experience? It´s supposed to be very rainy in the lowlands, until you reach the “Himalaya rain shadow”, but in many places it says the rains comes mainly in the afternoon/evening… Was that so for you?
Also, was that scree route on the way to Tilicho Lake really that scary?
Thanks in advance 😉
Thank you for reading and feedback, Fernando!
Leeches totally depend on how you dress and luck(I guess). I was walking with my pants tuck inside my thick trekking socks despite the heat and humidity in the first two days and last 3 days. Also, by all means, I was avoiding walking through the high grass. Though I wasn’t looking instagrammable and feeling overdressed, somehow it helped me to avoid leeches. My friends who were trekking Annapurna Sanctuary (also Conservation Area) were attacked by leeches from all the sides during the same time.
Personally, my biggest challenge in trekking Annapurna after monsoons was crossing rivers and waterfalls. They are increasing in size after the rain season, sometimes washing off the paths and you need to adjust the itinerary. I took a decision to walk around 2 km extra after seeing the high waterfall flow that I needed to cross to Chame. The flood after Jomsom modified my further itinerary.
Usually, trekkers take a lift from Jomsom or Kalopani. Because of the landslides, the motorable roads were blocked and I found it will be faster if I trek by foot.
In my experience, the rains occurred either in the second part of the day or during the night (during the first 3 days of the trek). I tried to start the day between 6 and 7 am so I can reach my final destination by 2 or max 3 pm.
Tilicho is challenging, though not that scary once you start walking along the path. It is only scary on some parts when someone walks towards you and you need to give the way.
Take a look through my itinerary description day by day in the post, I think I mentioned in details the challenges I faced/weather/accommodation. If you have any other questions, don’t hesitate to ask!
Annapurna Circuit is one of my life-changing experiences) I wish you a great adventure as well!
Amazing! Thank you for this post!
Thank you for reading, Frederik!
Hello Natalia!
Many thanks for sharing your route! It looks amazing, I am going there in two weeks and I will follow it. I am also considering the option to trek by myself and meet other trekkets during the way in order not to do it alone. I would like to ask you how did you follow the track by GPS, were you using maps.me or wikilok?
Many thanks!
Hello, Mariona! Thank you for reading! I was following the map which I received in Pokhara when I applied for my trekking permit.
I started with a group of people, but we started splitting from the second day as we all had different paces and goals. Plus I also wanted to do Tilicho, ice lake, and Poon Hill.
You will meet plenty of people on the way and with some, you will even end-up finishing the day in the same village. From 3rd day I walked alone daily and in the evening I was crossing my paths with others.
Due to the influx of trekkers and locals, you don’t really feel alone, to be honest.
if we want to go from muktinath to tatopani in one day, what will be transport option ??
Not sure about direct from Muktinath, but from Jomsom for sure. It’s a long road which is not in good condition at times, consider breaking it in 2 parts